In my Embedded Linux courses, I’m using Qemu to simulate a Linux system. Qemu simulates many boards including hardware, interrupts, networking and more.
In this tutorial, I’ll cover the steps to build a complete system including kernel, filesystem, and application
Qemu – Building from source
You can install binary version but it is better to download and build Qemu from source because we can use the source to simulate a new hardware.
# wget https://download.qemu.org/qemu-2.11.0.tar.xz
# tar xvJf qemu-2.11.0.tar.xz
# cd qemu-2.11.0
# ./configure
The last step checks if your system meets all qemu requirements. If you get error messages you need to install missing packages. I’m using Ubuntu and it’s very easy to install the missing parts, for example, I got the following message:
ERROR: glib-2.22 gthread-2.0 is required to compile QEMU
after searching Google install the required packages
# sudo apt-get install libglib2.0-dev zlib1g-dev
more packages needed:
# sudo apt-get install libpixman-1-dev
# sudo apt-get install libsdl2*
Now run configure again and check that SDL support is reported yes
run make
# make
# sudo make install
To check if qemu is installed correctly run
# qemu-system-arm -M ?
ARM Toolchain
The first thing we need to install is a cross toolchain for ARM. Go to Arm.com and download the Linux version, extract it in ~/armsystem/toolchain directory
Add the location to the PATH environment variable:
# export PATH=/home/developer/armsystem/toolchain/gcc-arm-none-eabi-7-2017-q4-major/bin/:$PATH
Linux Kernel
Go to https://www.kernel.org/ and download the latest kernel. It is recommended to use long-term supported version. Extract the files in an empty directory ~/armsystem/kernel
Edit the kernel Makefile (line 253)
ARCH		?= arm
CROSS_COMPILE	?= arm-none-eabi-
Set the config file
# make vexpress_defconfig
Run make
# make -j4
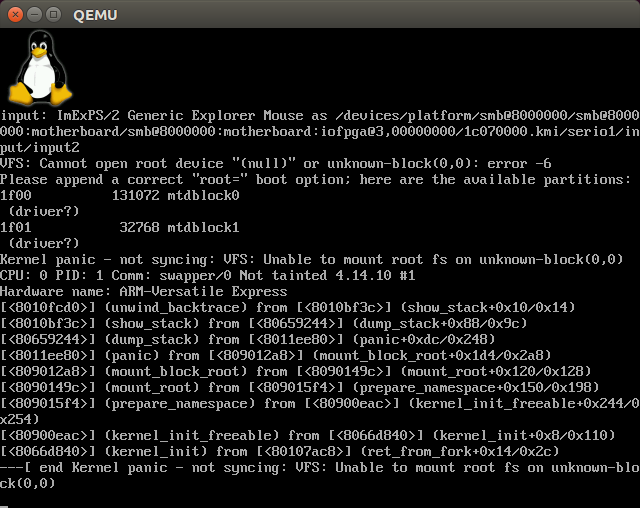
Now we can check the kernel in QEMU using the command:
# qemu-system-arm -M vexpress-a15 -m 512 -kernel arch/arm/boot/zImage -dtb arch/arm/boot/dts/vexpress-v2p-ca15-tc1.dtb -append "console=tty1"
The system will boot but crashed because we didn’t build the file system yet
Building The Filesystem
We can use many tools to build an embedded Linux file system. Some examples are buildroot, OpenWRT, yocto
In this tutorial, we will use buildroot because it is the easiest tool
Download the latest Buildroot package from here and extract it in ~/armsystem/fs
Open the configuration menu:
# make menuconfig
On the target options select target architecture – ARM
You can use buildroot to download and install an external toolchain from Sourcery (recommended) or use the existing toolchain we already downloaded
We will use the Sourcery toolchain because it has some plugins to IDEs
To download Sourcery toolchain – from the toolchain menu select:
- Toolchain type (External toolchain)
- Toolchain (Sourcery CodeBench ARM 2014.05)
- Toolchain origin (Toolchain to be downloaded and installed)
- Copy gdb server to the Target
Save the configuration and build it
# make
After the build is finished without errors you can find the new toolchain in
~/armsystem/fs/buildroot-2017.02.8/output/host/usr/bin
Add it to the PATH variable, change the kernel Makefile and build it again
ARCH		?= arm
CROSS_COMPILE	?= arm-none-linux-gnueabi-
The generated file system is located in buildroot/output/target but we can’t use it yet
Using Root Filesystem via NFS
The best way to work with embedded board, is to mount the target filesystem via NFS (on the host) to do that, we need to do some setup:
Install NFS server
# sudo apt install nfs-kernel-server
Edit /etc/exports to add the NFS folder
/home/developer/armsystem/outfs *(rw,sync,no_root_squash)
Restart the NFS server
# sudo /etc/init.d/nfs-kernel-server restart
[ ok ] Restarting nfs-kernel-server (via systemctl): nfs-kernel-server.service.
Configure QEMU tap networking
Qemu can use a private networking with ubuntu using tap/tunnel mode. To setup it, create the file /etc/qemu-ifup:
#!/bin/bash
exec /sbin/ifconfig $1 192.168.0.1
Add execute permission to the file (chmod a+x /etc/qemu-ifup)
Creating the Root Filesystem folder
Copy the generated files ~/armsystem/outfs
# cp -r -d [buildroot]/output/target/* ~/armsystem/outfs
Now add the following device files using root user:
# sudo mknod ./dev/console c 5 1
# sudo mknod ./dev/zero c 1 5
# sudo mknod ./dev/null c 1 3
# sudo mknod ./dev/tty1 c 4 1
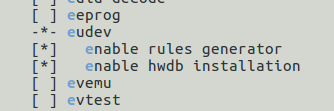
If you want the device files to generated automatically, configure udev. With buildroot it is very easy:
From the system configuration menu select /dev management (Dynamic using devtmpfs + eudev)
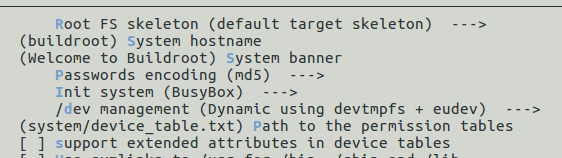
And from Target packages > Hardware handling menu, select eudev
Build buildroot and you will see the udev running on init:

Create the running script
Create a script in ~/armsystem – run_qemu
qemu-system-arm -M vexpress-a15 -net tap -net nic -m 512 -kernel kernel/linux-4.14.10/arch/arm/boot/zImage -dtb kernel/linux-4.14.10/arch/arm/boot/dts/vexpress-v2p-ca15-tc1.dtb -append "console=tty1 root=/dev/nfs rw nfsroot=192.168.0.1:/home/developer/armsystem/outfs ip=192.168.0.2:192.168.0.1:192.168.0.1:255.255.255.0:qemu:eth0"
Add execute permission and test it using sudo (It starts a new network device)
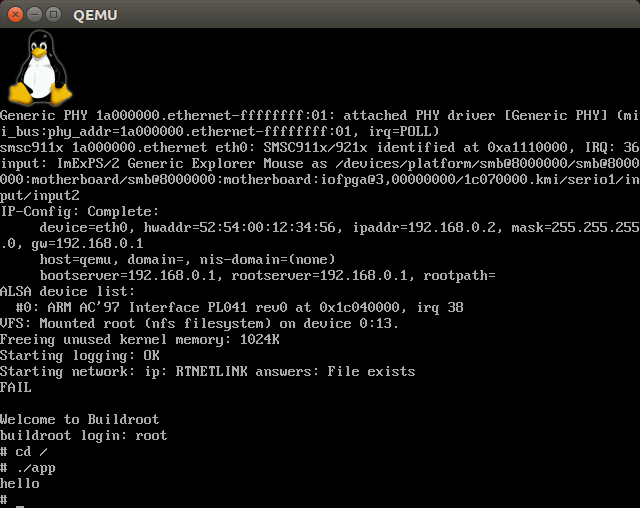
# cd ~/armsystem
# sudo ./run_qemu
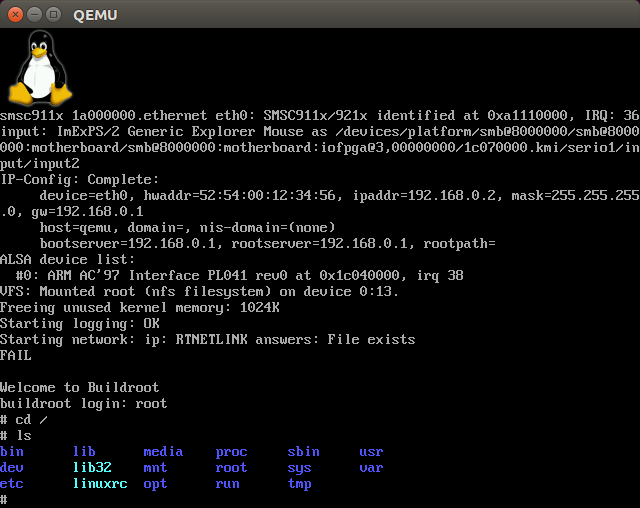
That’s it!!!
We can now write a testing application, compile and run in qemu:
#include<stdio.h>

void main(void)
{
	puts("hello");
}
# arm-none-linux-gnueabi-gcc -o app ./a.c
# cp ./app ~/armsystem/outfs/
Now we can also build complex applications, kernel modules and more (Next posts …)
9 thoughts on “Building Embedded Linux System with Qemu”
Comments are closed.
Wow , you are so impressive! I was a student with Linux certs with hand on experience as a student but nit much work experience with Linux but microsoft. I will want to istall and do this. Thank you for sharing and posting this. Very appreciated!
Thanks to sharing tour Know-how.
[…] Let go over the process. You can do it yourself , just build an Embedded Linux system with QEMU […]
Hi,
Great article.
For QEMU for Zynq board, Do I have to do some adjustment ? Thanks
[…] are seeing this because your blog was recently used as part of a DDOS attack against […]
Hello, thank you for this amazing post. I’m having some issues running the script and i was wondering if you could help. when i try to run the running script, I come across an error that says:
qemu-system-arm: could not configure /dev/net/tun: Operation not permitted.
I’m not sure what to do, please help :).
Thanks
you should run the script with root permissions – use sudo
thank you so much, for this post, just have some issues when I try to run the script. I get an error that the /etc/qemu-ifup: no bridge for quest interface found. I followed the steps but this last part has me stuck. thanks.
How can I run a java program inside my virtualized linux system ?