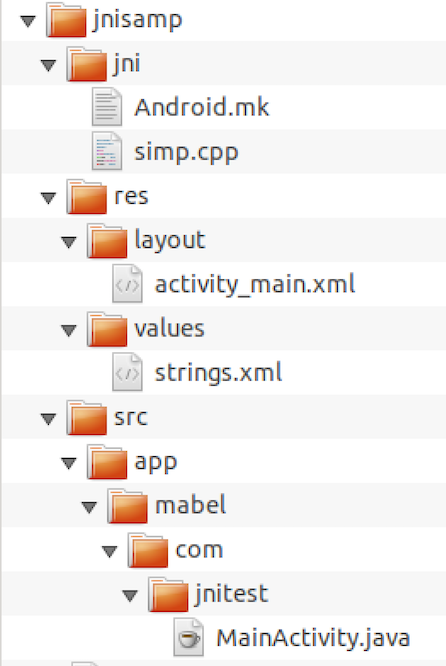
In this lab, you will create a system application with native code support built into AOSP
- Create an Android studio project with C++ support
- Add class for native methods:
class Native{
	static{
		System.loadLibrary("simp");
	}
	static native int sub(int a, int b);
	static native int add(int a, int b);
}
3. Implement the native code and add JNIOnLoad function:
namespace com_example_cpptest {

   // TODO: Add your methods

    static JNINativeMethod method_table[] = {
       // TODO: declare all methods
    };
}

using namespace com_example_cpptest;

jint JNI_OnLoad(JavaVM* vm, void* reserved) {
    JNIEnv* env;
    if (vm->GetEnv(reinterpret_cast<void**>(&env), JNI_VERSION_1_6) != JNI_OK) {
        return JNI_ERR;
    } else {
        jclass clazz = env->FindClass("app/mabel/com/jnitest/Native"); // TODO: change to the correct package
        if (clazz) {
            jint ret = env->RegisterNatives(clazz, method_table, sizeof(method_table) / sizeof(method_table[0]));
            env->DeleteLocalRef(clazz);
            return ret == 0 ? JNI_VERSION_1_6 : JNI_ERR;
        } else {
            return JNI_ERR;
        }
    }
}
4. Add a simple button and test the native methods
5. Create a directory app in ~/aosp/device/generic/goldfish (here you will store all android applications built into the rom)
Add a generic Android.mk file to call other makefiles in the sub directories:
include $(call all-subdir-makefiles)
6. Create the following directory structure in app:

7. Add the following file to the activity_main.xml (res/layout):
<?xml version="1.0" encoding="utf-8"?>
<LinearLayout xmlns:android="http://schemas.android.com/apk/res/android"
    xmlns:app="http://schemas.android.com/apk/res-auto"
    xmlns:tools="http://schemas.android.com/tools"
    android:layout_width="match_parent"
    android:layout_height="match_parent"
    tools:context="app.mabel.com.myapplication.MainActivity">


    <Button
        android:id="@+id/button1"
        android:layout_width="wrap_content"
        android:layout_height="wrap_content"
        android:text="@string/btn"
        tools:layout_editor_absoluteX="140dp"
        tools:layout_editor_absoluteY="197dp" />

</LinearLayout>
and the string table to res/values/strings.xml:
<resources>
    <string name="app_name">JniTest</string>
    <string name="btn">Test</string>
</resources>
8. Create Android.mk file in the jni directory :
LOCAL_PATH:= $(call my-dir)
include $(CLEAR_VARS)
LOCAL_MODULE_TAGS := eng

LOCAL_MODULE := libsimp
LOCAL_SRC_FILES:= simp.cpp
LOCAL_SHARED_LIBRARIES := \
	libutils liblog libcutils

LOCAL_C_INCLUDES += \
	$(JNI_H_INCLUDE)

LOCAL_CFLAGS += -O0 -g3

include $(BUILD_SHARED_LIBRARY)
9. Create Android.mk file in jnisamp directory:
LOCAL_PATH:= $(call my-dir)
include $(CLEAR_VARS)
LOCAL_MODULE_TAGS := eng
LOCAL_SRC_FILES := $(call all-java-files-under,src)
LOCAL_PACKAGE_NAME := JniTest
LOCAL_JNI_SHARED_LIBRARIES := libsimp

LOCAL_PROGUARD_ENABLED := disabled

include $(BUILD_PACKAGE)

include $(call all-makefiles-under,$(LOCAL_PATH))
10. Add the java and c++ files from your project
11. Add AndroidManifest.xml file to jnisamp directory:
<manifest xmlns:android="http://schemas.android.com/apk/res/android"
        package="app.mabel.com.jnitest">

    <application
        android:allowBackup="true"
        android:label="@string/app_name"
        android:supportsRtl="true">
        <activity android:name=".MainActivity">
            <intent-filter>
                <action android:name="android.intent.action.MAIN" />
                <category android:name="android.intent.category.LAUNCHER" />
            </intent-filter>
        </activity>
    </application>

</manifest>
12. build the rom and test your code
Run your application with system privileges
Add coreApp and sharedUserId to the manifest file:
<manifest xmlns:android="http://schemas.android.com/apk/res/android"
        package="app.mabel.com.jnitest"
        coreApp="true"
        android:sharedUserId="android.uid.system">
....


</manifest>
Add the following vars to main Android.mk file:
LOCAL_CERTIFICATE := platform
LOCAL_PRIVILEGED_MODULE := true
13. Build the rom and test your work